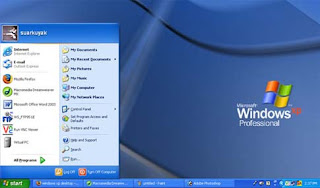
I’ve read a number of articles on the internet about changing the text on the Start button in XP. On more than one occasion I’ve seen references to a five (5) letter limitation when the button is renamed. I always wondered if this was true or just an assumption someone made because the default ‘start’ just happened to fit the button size. So, I decided to run a test and see if there really was a five character limit.
First of all just u need to do is download Resource hacker.
Resource HackerTM is a freeware utility to view, modify, rename, add, delete and extract resources in 32bit Windows executables and resource files (*.res). It incorporates an internal resource script compiler and decompiler and works on Win95, Win98, WinME, WinNT, Win2000 and WinXP operating systems.
ll its just 541Kb in the size.. Click here to go to the Download Page
Download Resource Hacker
First Step The first step is to make a backup copy of the file explorer.exe located at C:\Windows\explorer. Place it in a folder somewhere on your hard drive where it will be safe. Start Resource Hacker and open explorer.exe located at C:\Windows\explorer.exe
The category we are going to be using is String Table In Resource Hacker. Expand it by clicking the plus sign then navigate down to and expand string 37 followed by highlighting 1033. If you are using the Classic Layout rather than the XP Layout, use number 38. The right hand pane will display the stringtable as shown in Fig. 02. We’re going to modify item 578, currently showing the word “start” just as it displays on the current Start button.
There is no magic here. Just double click on the word “start” so that it’s highlighted, making sure the quotation marks are not part of the highlight. They need to remain in place, surrounding the new text that you’ll type. Go ahead and type your new entry
Second Step – Modify the Registry Now that the modified explorer.exe has been created it’s necessary to modify the registry so the file will be recognized when the user logs on to the system. If you don’t know how to access the registry I’m not sure this article is for you, but just in case it’s a temporary memory lapse, go to Start (soon to be something else) Run and type regedit in the Open: field. Navigate to:
HKEY_LOCAL_MACHINE\ SOFTWARE\ Microsoft\ Windows NT\ CurrentVersion\ Winlogon
the Right pane (Fig. 05), double click the Shell entry to open the Edit String dialog box as shown in Fig. 06. In Value data: line, enter the name that was used to save the modified explorer.exe file. Click OK.
Close Registry Editor and either log off the system and log back in, or reboot the entire system if that’s your preference. If all went as planned you should see your new Start button with the revised text.
Thursday, February 18, 2010
Saturday, February 13, 2010
how to increase your RAM and experience system speed !!!
1). Start any application, say Word. Open some large documents.
2). Press CTRL+SHIFT+ESC to open Windows Task Manager and click Processes tab and sort the list in descending order on Mem Usage. You will notice that WINWORD.EXE will be somewhere at the top, using multiple MBs of memory.
3). Now switch to Word and simply minimize it. (Don't use the Minimize All Windows option of the task bar).
4). Now go back to the Windows Task Manager and see where WINWORD.EXE is listed. Most probably you will not find it at the top. You will typically have to scroll to the bottom of the list to find Word. Now check out the amount of RAM it is using. Surprised? The memory utilization has reduced by a huge amount.
5). Minimize each application that you are currently not working on by clicking on the Minimize button & you can increase the amount of available RAM by a substantial margin. Depending upon the number and type of applications you use together, the difference can be as much as 50 percent of extra RAM.
In any multitasking system, minimizing an application means that it won't be utilized by the user right now. Therefore, the OS automatically makes the application use virtual memory & keeps bare minimum amounts of the code in physical RAM.
Thursday, February 11, 2010
Easy way to find Drivers for an Unknown Device
The worst thing about a format and reload is that sometimes, it is impossible to find all of your drivers.
Usually I have lost the driver disks. If it is a “White Box Special” that I built from NewEgg…well I will have no idea what components I put into it.
I have found an excellent solution – a free tool called “Unknown Devices”
Zip on over to Halfdone Development and download a free copy. Don’t let the old build date fool you – the program still works quite well…even on Windows 7 and Vista systems.
When you download it, make sure you extract the exe *and* the zip file…and they remain in the same folder. I made a mistake of thinking the zip file was not necessary. It contains all of the driver lookup information.
A good example is a white box that I built a year or two ago. I formatted it, and could not even remember who made the motheboard.
A peek at the device manager shows the unknown devices:
Easily found by this cool little utility. Run it, and bam – it shows me a list:
After that, I was able to right click on them and do a search on google. Within 30 minutes I was able to get all of my drivers downloaded and installed.
Give it a spin, it will save you a ton of time when trying to find the drivers after a rebuild – and it beats tearing the machine open to read model numbers.
Filed Under: Drivers, Tools, Utility
Windows Short Cut KEYS EXPOSED
There are some windows keyboard shortcuts you never knew exist but i have too time to practically check them myself and they are more fun ...
(CTRL+INSERT) Copies the item or items selected to the Clipboard.
(SHIFT+INSERT) Pastes the copied item or items from the Clipboard.
Said to Work in Linux, DOS, Apple Mac and even Unix Operating systems as well.
(Shift+Alt+Print Screen) brings up high contrast mode brings, which is a special display and font size for people who are visually impaired, just hit ok when the box comes up and changes will take effect. (note:use the same combination to return settings to normal)
Ctrl+alt+arrow key flips screen orientation
Windows Button + Pause, brings up the system properties.
Shift+F10 brings up the context menu
While in a display pane (such as when viewing an Event Log, or any MMC snap-in), Ctrl+ autosizes each column to the maximum width of data in each column. Ctrl + Shift + Esc – Brings up the task manager
CTRL and A Selects all the items in the active window.
CTRL and C Copies the item or items to the Clipboard and can be pasted using CTRL and V.
CTRL and F Displays the Find all files dialog box.
CTRL and G Displays the Go to folder dialog box.
CTRL and N Displays the New dialog box.
CTRL and O Displays the Open dialog box.
CTRL and P Displays the Print dialog box.
CTRL and S Displays the Save dialog box.
CTRL and V Pastes the copied item or items from the Clipboard.
CTRL and X Cuts the item or items selected to the Clipboard.
CTRL and Z Undoes the last action.
CTRL and F4 Closes the active document window.
CTRL while dragging an item Copy the selected item
CTRL+SHIFT with arrow keys Highlight a block of text
CTRL+F4 Close the active document
CTRL+ESC Display the Start menu
CTRL and F6 Opens the next document window in the active application.
ALT+ENTER View the properties for the selected item
ALT+F4 Close the active item, or quit the active program
ALT+SPACEBAR Open the shortcut menu for the active window
ALT+TAB Switch between the open items
ALT+ESC Cycle through items in the order that they had been opened
F1 key Gives help on the active window or selected item.
F2 key Rename the selected item
F3 key Search for a file or a folder
F4 key Display the Address bar list in My Computer or Windows Explorer
F5 key Update the active window
F6 key Cycle through the screen elements in a window or on the desktop
F10 key Activate the menu bar in the active program
Windows Logo Display or hide the Start menu
Windows Logo+PAUSE Display the System Properties dialog box
Windows Logo+D Display the desktop
Windows Logo+M Minimize all of the windows
Windows Logo+SHIFT+M Restore the minimized windows
Windows Logo+E Open My Computer
Windows Logo+F Search for a file or a folder
CTRL+Windows Logo+F Search for computers
Windows Logo+F1 Display Windows Help
Windows Logo+ L Lock the keyboard
Windows Logo+R Open the Run dialog box
Windows Logo+U Open Utility Manager
TAB Move forward through the options
SHIFT+TAB Move backward through the options
CTRL+TAB Move forward through the tabs
CTRL+SHIFT+TAB Move backward through the tabs
ALT+Underlined letter Perform the corresponding command or select the corresponding option
ENTER Perform the command for the active option or button
SPACEBAR Select or clear the check box if the active option is a check box
F1 key Display Help
F4 key Display the items in the active list
Arrow keys Select a button if the active option is a group of option buttons
BACKSPACE Open a folder one level up if a folder is selected in the Save As or Open dialog box
END Display the bottom of the active window
HOME Display the top of the active window
NUM LOCK+Asterisk sign (*) Display all of the subfolders that are under the selected folder
NUM LOCK+Plus sign (+) Display the contents of the selected folder
NUM LOCK+Minus sign (-) Collapse the selected folder
LEFT ARROW Collapse the current selection if it is expanded, or select the parent folder
RIGHT ARROW Display the current selection if it is collapsed, or select the first subfolder
Wednesday, February 10, 2010
Make Free Calls !!!!
Hello Guys Today I will Give you the Full Proofed Hack to Call From PC to Mobile without paying a Penny.
And this is 100% working and tested hack.
THINGS THAT YOU NEED TO MAKE FREE CALLS:
1.A Personal Computer(PC) With Headphones
2.Yahoo Messanger
3.A client Phone Number Whom You want to call.
All the Phone call Hacks provided upto Now are not Working One's . Now I have been Personally using This Hack for more than 15 days. And its Going Well.
HOW TO MAKE FREE CALLS ?
1. Download the latest Yahoo Messanger.
2. Install The Yahoo Messanger and Login Into your yahoo Account.
3. Type the Following Number +18003733411 in the Red Box Shown Below and Press Enter.
4. After Pressing Enter a small Window will open showing Connecting a Call to that number . Shown Below
5. Now Listen the Call And Wait Untill She Say "Free Calls" .
6. When she Says Free Calls Use Your Microphone and Say Free Calls (Don't forgot to unmute your microphone Voice in Volume Properties By Right Click on Volume Icon in your Task Bar and then click on properties and then Advanced and then unclick mute button under Microphone).
7. As you say Free Calls You will be Able To make 5 minutes free call anywhere in the World.
Now Click on the Dialpad As Shown Below To dial the Number.
8. Now The Dial Pad Opens Like Below
9. Now Dial The Number In format Country code followed by friends number whom you want to call.
Example : 919457196088 where 91 is country code for India and 9457196088 is phone number.
After dialing wait 2 sec for phone call to connect . After that You can call Upto 5 minutes Unlimited.
Sunday, February 7, 2010
How to Fix a scratch on the LCD Screen
Every few years, the standards that are associated with computer peripherals change. For example, the previous CD-Rom standards were upgraded to CD writers, then it became DVD drives and the now, the accepted standard are DVD writers.LCD monitors are the new standard in computer displays. Though they have not yet replaced CRT (cathode ray tube) monitors completely, LCD monitors are fast rising in popularity because of their extremely sleek looks, lower power consumption and more convenient footprint on a desk.
LCD monitors at this point are still quite expensive though and thus, extra care should be given to the unit so that it will maintain its pristine condition.
Probably the most important part that should be taken care of in an LCD monitor is the screen itself. The screen is not as tough as the glass tube of a CRT. If you have an LCD screen you will notice that only a clear, thick plastic separates your fingers from the actual components of the LCD. It is imperative that you take care of your LCD screen as much as possible and prevent it from being scratched.
There is a way though of repairing a scratched LCD screen though that is inexpensive and very easy. All you need is Vaseline petroleum jelly to fill the scratch on the LCD screen. This very simple remedy works because the optical density of Vaseline more closely matches the LCD face compared to air.
All you need to do is to clean the surface of the screen and then take some Vaseline and fill the scratch with it. Gently wipe off the excess Vaseline taking care not to wipe too forcefully so that you leave some inside the scratch.
Free MOBILE Browsing Code Generator
Saturday, February 6, 2010
you can increase Free Browsing Speed Using this Simple Tweak
A Simple Tweak (XP Pro only) which will increase your dial up Speed.
Make sure you Log on as Administrator, not as a user with Administrator privileges.
Follow the steps as given below-
1) Click on Start Button.
2) Select Run From Start Menu.
3) Type gpedit.msc
4) Expand the [Administrative Templates] branch.
5) Then Expand the [Network] branch.
6) Highlight(Select by Single Click) [QoS Packet Scheduler]
7) Double-click [Limit Reservable Bandwidth] (Available in Right Side Panel)
8) Check(Select By Single Click on it) [Enabled]
9) Change [Bandwidth limit %] to 0 %
10) Click [OK] Button.
11) Restart Your PC.
12) Now Check Your free browsing Speed.
Improve Windows-XP Shutdown Speed
This tweak reduces the time Windows-XP waits before automatically closing any running programs when you give it the command to shutdown.
Follow the steps as given below-
1) Go to Start then select Run
2) Type 'Regedit' and click ok
3) Find 'HKEY_CURRENT_USER\Control Panel\Desktop\'
4) Select 'WaitToKillAppTimeout'
5) Right click and select 'Modify'
6) Change the value to '1000'
7) Click 'OK'
8) Now select 'HungAppTimeout'
9) Right click and select 'Modify'
10) Change the value to '1000'
11) Click 'OK'
Can you create a FOLDER or FILE with no NAME ??
This trick will allow you to create files and folders without any name.
Just follow the steps as given below :-
1) Select any file or folder.
2) Right click on it, select 'Rename' or simply press 'F2'.
3) Press and hold the 'Alt' key. While holding the Alt key, type numbers '0160' from the numpad.
Note :- Type the numbers '0160' from the numpad, that is, the numbers present on the right side of the keyboard.
Don’t type the numbers which are present on top of the character keys.
4) Press Enter and the nameless file or folder will be created.
Reason :- The file or folder that seems nameless is actually named with a single space.
But what if you want to create another nameless file or folder in the same directory ?
For this you will have to rename the file with 2 spaces.
Just follow the steps given below :-
1) Select file, Press 'F2'.
2) Hold 'Alt' key and type '0160' from the numpad.
3) Release the 'Alt' key. Now without doing anything else, again hold 'Alt' key and type '0160'.
4) Press 'Enter' and you will have second nameless file in the same directory.
5) Repeat step 3 to create as many nameless files or folders in the same directory.
(We have a problem with deleting these folders, to do so, start your computer in 'Safe Mode' and delete it from there.)
Subscribe to:
Posts (Atom)